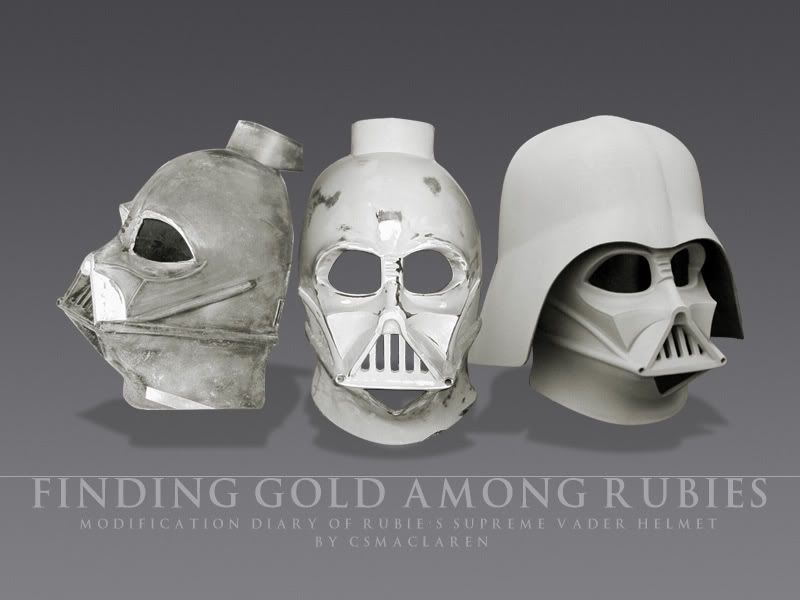
Modification of a Rubie's Supreme Helmet's facemask
Foreword
Rubie's Costume Company, Inc. of New York, USA is the manufacturer of a licensed Darth Vader helmet and costume based on Revenge of the Sith (ROTS). The helmet has a street price of $70-120 while the costume ranges $600-$1,200. I was initially inspired by the famous "Chad Vader" parody films on YouTube.com and thought it looked great...
... until some discerning fans who study every square milimeter of DVD and HD stillframes (screen captures) of Vader pointed out how erroneous the Rubie's helmet was. This began a journey of learning. Originally, I was interested in acquiring the Rubie's costume to make a parody film of my own, but the more the flaws and inaccuracies of the Rubie's costume became apparent, I felt it diminished the costume's ability to potently portray the character of Vader on the screen.
Years back (we're talking the 80's and 90's) Don Post Studios released a limited edition of 1,000 Don Post Deluxe (DP DLX) Vader helmets made of fiberglass -- a kind of "holy grail" of prop replica collecting, and a standard against which many would compare available replica helmets against. They also released the Don Post Classic Action (DP CA)-- a less expensive vinyl version that is allegedly made from the same molds but there are notable differences that merit another article.
Well, that was then. It's been a long time since an affordable life-sized helmet and mask of Darth Vader was available to the public. Rubie's marketing literature claims that it is cast from original molds. Now that I own two original Don Post Deluxe fiberglass Vaders, a DP DLX recast kit I found off eBay from someone in Germany, and a DP CA recast kit made by someone here in the States. These four sources represent four separate helmets of Don Post Studios lineage and -- guess what -- they look extremely different from the Rubie's Supreme Vader helmet.
Now the license that Rubie's holds is based on ROTS (Episode III). The only 100% screen-accurate ROTS helmet is made by Master Replicas. There is great dissimilarity between Rubie's and MR's helmets. Rubie's is asymetrical like the helmets of the original trilogy (OT) so it's logically based on the OT. It is rumored (though I cannot confirm it) that Rubie's bought out Don Post Studios. Interestingly there is similarity between Rubie's Limited Edition Vader (fiberglass) and the Don Post Deluxe. However that similarity did not make it to the Rubie's Supreme (plastic).

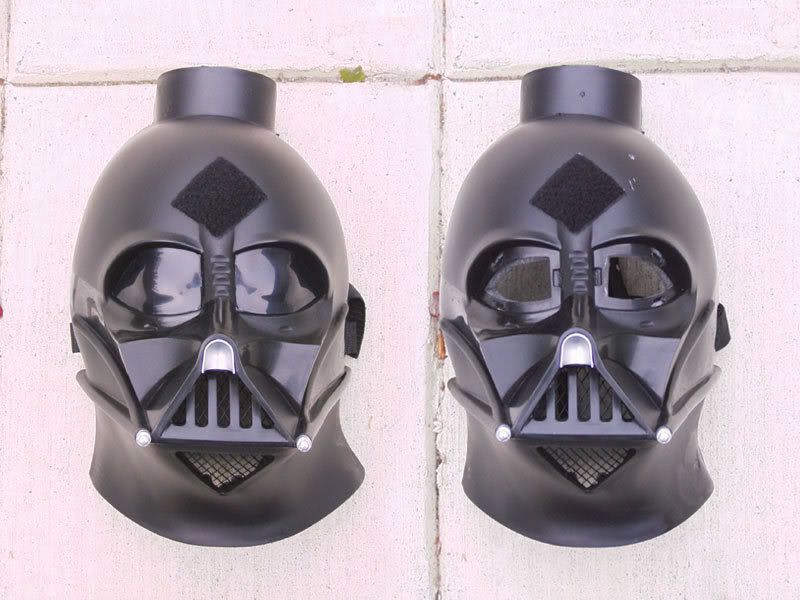
How acceptable or unacceptable to a diehard fan depends on the fan photographing it. The above shows the same helmet photographed from two differences, then combined into this montage. The one on the left was photographed 5 feet away, but zoomed in. The one on the right was taken about 2 feet away -- but because of perspective distortion the face appears bigger while the helmet appears proportionately smaller, and thus you do not get the proper proportions. The inset image is the publicity photo used by retailers of the Rubie's Supreme. It is believed by some that it was Photoshopped to be made to look more symetrical.
Inaccuracies of the Rubie's Facemask
1. The lenses are front-mounted and should be rear-mounted. Further, the lenses are the wrong shape. There should be a natural curvature, not like someone used their thumb to press into the plastic while it was hot.
2. The bridge of the nose is off-center. You see four clefts into the bridge. There should be three. In reality the forth cleft is more of a depression or bevel, in that the surface of the bridge ends there and sweeps down to form the lower eyelids.
3. The five mouth vents are round-ended and should be square ended. (Addendum 1/9 - There is an incline at the bottom of each vent. These can be removed, but overall the vents should end lower. More on this later.)
4. The eyebrows lack the "frown" found on the props (a loss of "menace" that makes Vader what he is)
5. Of the triangular mouth, the left mouth wall is thicker than the right and the bottom. On the prop, they should be of similar thickness.
6. The nose has a piece of plastic stuck in there and it should be painted. The nose wal here is too thin, but if made thicker, it should be thinner than the mouth walls.
7. The alternating paint scheme (in case you hadn't noticed that the original props had one) is reversed. The upper left eyelid area and the right cheek should be highlighted (among other things).
8. The neck on the right side (as you face the helmet) is flared out.
9. The facemask, overall, is very wide.
10. The neck is very thick and the chin is somewhat buldging. It needs to be more contoured.
11. The dips beneath the lower eyelids are small and incorrectly shaped and positioned.
The helmet has a center bevel but it's obscure. The "eyebrows" of the helmet are also obscure.
Currently in this tutorial, I'm not going to address that (at least not for now).
Some say the Rubie's is PVC plastic while some believe it to be vinyl. This is a strong plasticy material that if pressed hard enough will flex. Heat will soften it up. Some people try soaking their masks in very hot water, but I opted for a $40 heat gun. I would heat large areas for a few minutes at roughly 1100F. As you do, the fine granular "paint finish" will start to melt. If you hold the heat gun too close, it will start to make the plastic look wet. If you hold it too close and too long, it will start to melt. Depending on where you heat it, you may see it sag under its own weight.
(Above: Left, before heat treatment. Right: After heat treatment modifications.)
Once you've exposed it to heat for about 3-5 minutes at that temperature, then run it quickly over to the kitchen sink and run cool water over it while pressing it to the desired shape. I recommend heating more than the immediate area because the memory of the surrounding area may resist your shaping. It's okay to wear heavy duty cloth-based oven mittens. At times I just used by bare hands.
The heat gun approach allows me to specifically focus on areas so I can to them a bit at a time. Here's what I've done.
1. The most obvious flaw is the neck flare on the right of the neck. I reduced it's flare-out so now it's not so pronounced.
2. Not so obvious is the thickness of the neck. It looks like Boss Nas' neck -- bulbous like a frog. Also it happened to be very wide and cylindrical. Once the neck flare was corrected, I sought to push the neck surface upwards and inwards so that the neck sides curved in more.
3. The chin (with the triangular vent) buldges out a little too much. So I used this opportunity to push this in a little. What i couldn't push in I later on filed down with a file.
4. The left side of the facemask sticks out more than the right. This is true of the original prop, yet the Rubie's mask is very wide overall. It's not so noticable here due to perspective distortion from my standing directly over it, but refer to to the previous photo.
5. Lastly, I changed the angle of the helmet receiver. People sometimes wonder why the flare on the back of the helmet doesn't always cover the back of the neck suffiently. Adjusting the receiver is part of a solution to allow the helmet to not only be mounted at a different angle but to allow the facemask to be slightly recessed and overshadow the eyes a bit. This is more of an A New Hope (Ep. IV) style but it looks very flattering to the Rubie's (shown later).
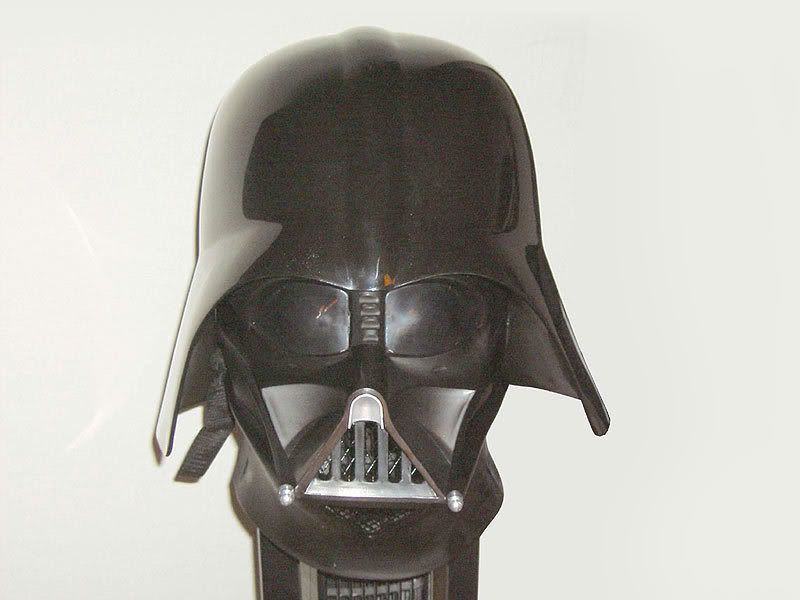
(Above: how it looks after heat treatment, photographed about 4 feet away).
Wow, that was a lot of work. Watch out for the fumes. I did this over an oven range with the overhead fans turned on. When sufficiently hot, I ran it over to the kitchen sink, bend it to shape, turn on the faucet, and with it held bent I'd cool it under running water.
The Skewed Mouth
I found this part to be the most difficult because a huge portion of the mask would need heat and would potentially undo the incremental changes I had done up till this point. I may have been able to move it up a hair, but ultimately decided to not do any more with it.
Liner Removal
Removal of the inner foam liner isn't necessary for this step. However, the liner will start disengaging due to heat. The heat gun is your friend if you want to remove the liner in one piece as it will melt the adhesive.
posted by CSMacLaren at
11:28 AM
|
0 comments
![]()
 Temple of Vader is about the prop kit of CSMacLaren who is on a humble journey to build or assemble a full replica Darth Vader costume to do home-made parody films and, if possible, help out a charity or two.
